
Setting up on top rope is an essential skill for anyone who wants to learn or teach ice climbing. I’ve written the following guide to tell you everything you need to know.
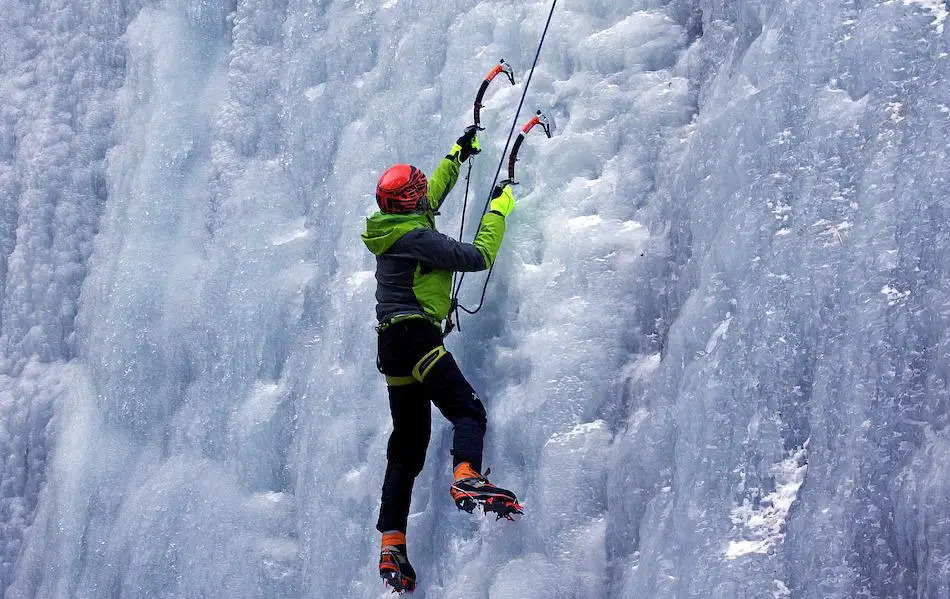
Top roping is a great way to learn ice climbing without needing to expose yourself to the dangers of ice climbing. To safely top rope, you need a good anchor system as well as proper belay methods.
Will Gadd, one of the best ice climbers in the world, has come out and said that no one should lead on ice before they’ve done at least 150 laps on top rope. This is because it allows you to get a feel for the technique of ice climbing without needing to worry about the danger of falling. Top roping is a whole lot safer, but that doesn’t mean that it’s completely without danger. You still need a proper anchor to hold you in place, and you need to make sure that your belayer is in the right position so they don’t get smacked by falling ice.
Into to Top Rope Ice Climbing
For those who don’t know, top roping is the practice of rock climbing with a rope that is fixed to a point above you and pulls you upwards. If this definition seems a bit weird, check out the video below for a better explanation:
See how the rope comes down the ice and then ties into the climber? As they move upwards, the belayer takes in the slack and tightens the rope, ensuring that thee climber won’t fall very far if they come off the surface of the ice.
This is in contrast to lead climbing, where you pull the rope up behind you. In lead, you fall a lot farther, because you have to wait for the rope to pass an anchor point before it tightens:
There are entire articles written about why lead falling is bad while ice climbing, so I won’t get into it here, but the important thing to know is this: before you lead on ice, you need to have to skill to ensure you’re never going to be able to fall. The only way to do this is to climb on top rope until you’ve taught your body how to move on ice.
So, because lead falling is so dangerous in ice climbing, knowing how to top rope is essential. There are a few things that you need to consider before you can start top roping:
- The Anchor Point
- How you’re getting up in the first place
- Where your belayer will stand
Anchor Points
To top rope, there needs to be a place on the wall that you can pass the rope through so that it can be pulled down and tied into the climber. This anchor point is what distributes the weight when you rest on the rope, so it needs to be solid enough to not only hold your body weight, but also to deal with any force that comes with a fall.
Not falls are completely static; if there’s any slack in the rope, you’re going to drop a bit before the rope tightens up, meaning that even more force will be transmitted through the rope and into the anchor point.
Because of this, the anchor point needs to be solid. This section is covered in greater detail later on, so for now just know that before you top rope you need to have somewhere to build a solid anchor.
Getting to the Anchor Point
This might seem a little obvious, but an anchor does you no good if you can’t actually get up to it in the first place. Remember, most people top rope a route because they’re not good enough to lead it. However, this leaves one fairly obvious question: if no one can lead the route, how is someone supposed to get up to the anchor in the first place?
There are a few ways to solve this issue:
Climb with a More Experience Partner
The most obvious, most common, and maybe safest answer is to go climbing with someone who’s more experienced than you. This is what I did when I was learning how to ice climb. My more experienced friend would go first, leading a route that I wasn’t yet confident enough to lead. He would set up a top rope anchor, and I would then climb the route as many times as I wanted before he would go up again to clean the route.
This is, in my opinion, the best way to get experience while ice climbing. You’ll get to try your skills on a variety of routes and a variety of different difficulties. More importantly, you’ll have a more experienced partner along with you, who can help you learn proper ice climbing technique and point out any safety errors you might be making.
However, by the same token, I know this isn’t a viable strategy for everyone. It requires not only that you have a more experienced partner who’s willing to go climbing with you, but also that you be able to line up your schedules for a full day of ice climbing. While this is a good way to learn, it’s somewhat unlikely that you’ll be able to get 150 laps on top rope in this fashion.
Because of that, there are a couple of other strategies I would suggest.
Find a Route with Top-Down Access
Thanks to the geography of certain climbing areas, there are certain routes that you’re actually able to walk around the top to and set up a top rope anchor in that fashion. If you don’t have a more experiences partner with you, this is perhaps the best way you’ll be able to get some experience ice climbing. Guidebooks for your local area should mention which routes have top access. Grab a partner — probably someone with little experience but hopefully a lot of stoke — and take turns lapping on the ice.
You won’t get the same coaching or variety of routes that you would in the former option, but you’ll get something that’s maybe more invaluable: experience. Using this method, you and your partner can trade laps for as long as you want (as long as you let other people from the crag use the ice as well), meaning you’ll be able to get lots of laps in.
Climb an Easier Route and Traverse Over

This is less for complete beginners and more for moderate/experienced climbers who are looking to push their limits, but it’s still a viable strategy. Say there’s a WI-5 that you want to project but don’t feel comfortable on; next to it there’s a WI-2 that you’re using for your warmups. Lead the WI-2, put a screw in at the top, and then traverse sideways until you can build an anchor above the route you want to climb.
Using this method can be super helpful if you’re an intermediate climber who wants to push yourself on more challenging climbs but doesn’t want to risk falling on them.
Where Your Belayer Will Stand
If there was one universal rule of ice climbing, it would probably be that the leader is never supposed to fall.
If there was a second, almost-as-universal rule, it would be: your belayer is going to get ice thrown at them.
Belaying while ice climbing, while sharing similar motions, is nothing like rock climbing (especially the indoor variety). You have to be constantly alert, because you can count on the fact that your climber is going to pull chunks of ice loose from the wall and send them tumbling down towards you.
Some of these chunks will be peddle-sized, which can cut up your face and run a serious risk of injury if they hit you in the eye; some of them will be large enough to cause real bodily damage if you’re not paying attention. I’ve seen chunks as large as a desktop computer come loose from just a few swings of an ice axe.
Now, it’s easy to feel complacent when you’re belaying on top rope, because you know how safe your climber is. That doesn’t mean, however, that you can ignore the danger that the ice poses.
One of the main things you can do to stay safe is to make sure that you’re always, always wearing your helmet. The other thing you need to do: watch where you’re standing. Picking a good location to belay from while ice climbing is essential, as it can prevent you from spending the entire time getting pelted.
Even once you pick a good location, you still need to be on the lookout for ice falling towards you. However, being able to read the route that your partner will be climbing and anticipate where the majority of the ice will come down is something that you should always take the time to do, because it can save you a lot of hassle and danger.
What Gear You Need
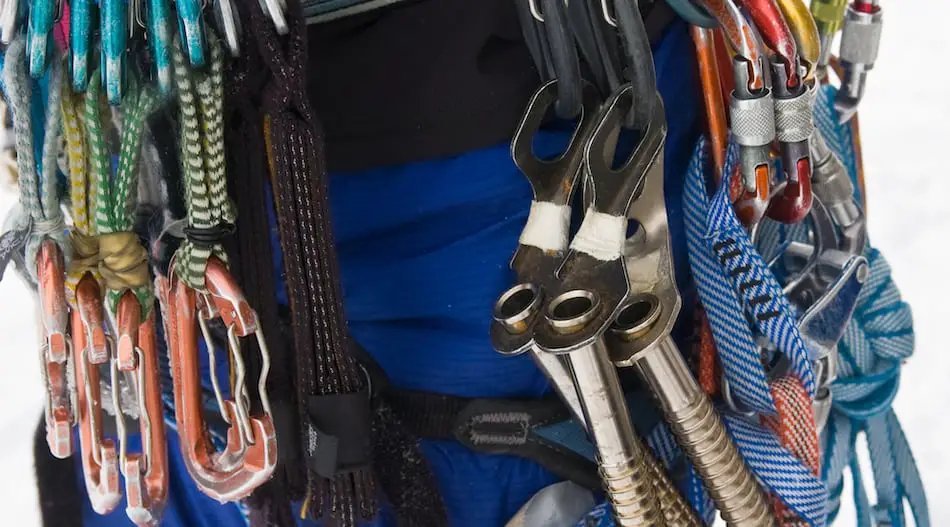
Now that we know the basics of top roping in ice climbing, let’s talk about what gear you need to have to be able to perform this. I would recommend bringing:
- Three ice screws
- Four locking carabiners (rated to at least 24kn of force)
- Two wire-gate carabiners
- Two long slings (>60cm)
- Two short slings (<60cm)
Now, that might seem like a lot of gear, and in some instances it’s definitely going to be overkill. However, if you’re trying to build anchors, it never hurts to have a few extra pieces that you can use to rig backups through.
Let’s look at the gear more in-depth to understand what it’s all for.
Ice Screws
These are twisted (screwed) into the ice 10-12 centimeters deep until they gain enough traction to hand your weight from. Usually they’re used to catch the fall of someone lead climbing, but they can also be used for making top rope anchors.
I would only recommend using ice screws to make an anchor if you’re experienced at placing them yourself and the ice is solid enough to get two good placements. If not, I would use chains/bolts in the rock, or find somewhere different to climb.
Locking Carabiners
Technically, you only need two lockers to build an anchor. It’s accepted best practice to secure your sling to the ice screw/bolts with a non-locking carabiner, while the lockers connect your rope to the sling.
However, I’ve always thought that if you have the locking carabiners, you might as well bring them with you and use a locker for all four positions, because no one ever died from being too safe.
Non-locking carabiners
Wiregates and other non-lockers are good for holding gear and clipping backups.
Slings
The slings are what you actually build the anchor out of. You can get away with using only one, but it never hurts to have a few extra along. The variety of length can help if you’re not familiar with the route and don’t know what kind of anchor you need to build.
The Setup Up
Now that you’ve got all of your gear, it’s time to actually build the anchor so that you can start climbing.
Now, anchor building is an important and tricky thing to do, so I’m going to say this right off the bat: this guide alone does not prepare you to building ice anchors. Your entire life is going to be dangling from this thing, and I don’t want that kind of responsibility. Seek expert advice from a certified guide before you begin building anchors.
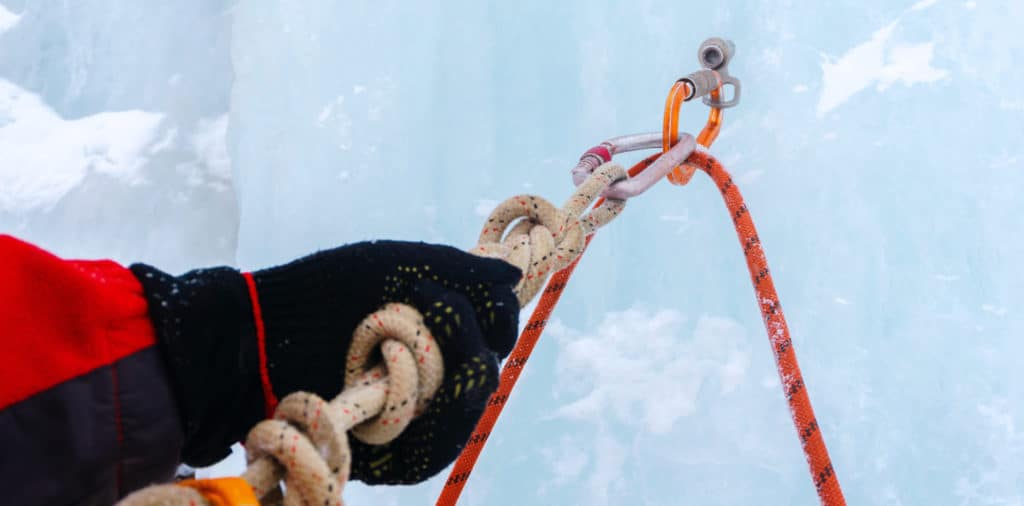
With that being said, though, there are a few pointers that I can give you. The first is the location of your anchor. There are really thee possibilities:
- The ice: For a lot of routes, you’ll have no choice but to build an anchor in the ice using your ice screws and v-threads. This takes a high degree of skill and experience, as you need to be able to tell whether or not the ice is solid enough to hold weight.
- Existing anchors: On a lot of routes, there will be bolts that have been put into nearby pieces of rock that you can use to build your anchors. For any sport climbers out there, this will be a familiar practice: you can go ahead and use your overhand or sliding-X anchor like you normally would.
- Other natural areas: Sometimes you need to get a little creative. Large boulders or trees wider than 6cm in diameter can function as solid anchors. Once again, though, I would caution against doing this unless you’ve received formal instruction into how to use these as an anchor.
One you’ve picked where you’re going to anchor the climb, it’s time to actually build the anchor. Like I said, there’s a lot more involved in anchor building than I have room to cover in this guide, so I would definitely seek out additional resources. Personally, I prefer to use a pre-equalized anchor, secure either with a figure-8 or a simple overhand knot. Others might choose something like a sliding-X.
Dismantling It
Once you’re done top roping, all that remains is to take down the gear and ensure you don’t leave anything behind.
If you had top-down access to your climb, it might be possible to simply clean the route from up there, rather than having to bother with climbing it one last time. In other scenarios, though, you’ll likely have to remove your gear from the route and then rappel down.
To do this, you use something known as a v-threat. A v-thread is when you use your ice screws to create two holes in the ice that are joined at the tips, creating a hollow ‘V’ shape. You then thread your rope through this hole and use it to rappel.
This is an awesome way to get down without having to leave any gear on the ice, although it is slightly dangerous in that you’re trusting the ice to hold your weight. Because of that, this is a technique that you should make sure to practice under safe conditions before you try it in real life.