
Multi-pitch climbing is, for many people, the culmination of years of hard work. On many routes, getting down can be almost as much effort as getting back up. I did some research and wrote the following guide on how to rappel off a multi-pitch route.
Rappelling from a multi-pitch requires either double-strand belays or single-strand belays with a blocking setup. In his way, you can retrieve your rope after each pitch, which allows you to descend the next pitch. The exact technique for rappelling from multi-pitch routes will vary depending on a number of factors, including the gear you have with you, the number of parties in your group, and what belay device you are using.
The tricky part about rappelling a multi-pitch is navigating long rappels with the gear you have on you. Many times while multi-pitch climbing, you want to carry as little gear as possible with you to cut down on weight. This means, however, that you can’t afford to be leaving any gear behind you on the wall. The solution to this is to use either double-strand rappels, or single-strand rappels that have a blocking cord, which allows you to retrieve the rope once you’ve descended.
In the article below I’m going to cover both techniques, as well as going a little more in-depth about what a multi-pitch rappel is.
Multi Pitch Climbing: An Introduction

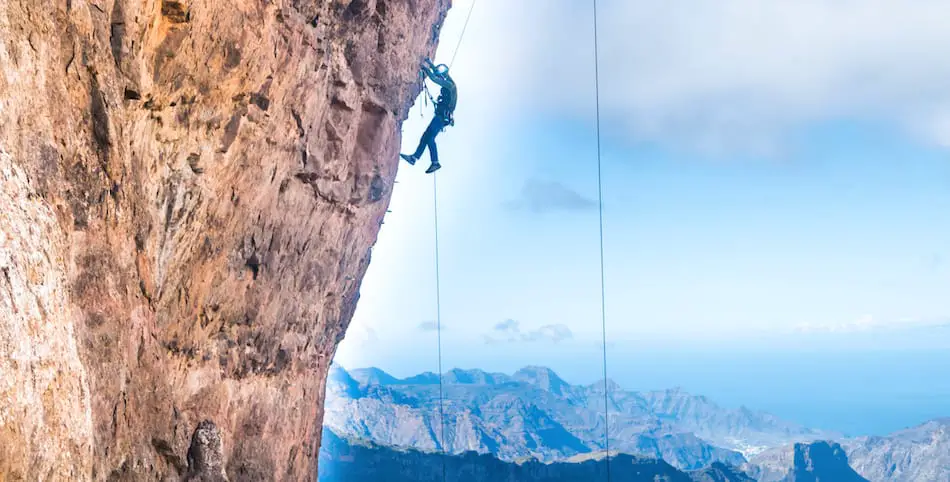
For many people, multi-pitch climbing is the mecca of the sport. For those who don’t know, a multi-pitch is a route that is too long to climb on a single piece of rope and therefore must be broken down into several sections, or ‘pitches’. A climber will ascend a pitch to a pair of anchors and then secure themselves in those anchors, before belaying his partner up the pitch beneath them. Then, they will climb the next pitch, and the next pitch, until they reach the top.
Because of the height, challenge, and sheer amount of climbing you get to pack into a day, multi-pitch climbing can be an incredible amount of fun. However, getting down from a multi-pitch route presents some unique challenges that single-pitch doesn’t.
Some routes, such as those on the world-famous El Capitan wall in Yosemite, are designed to be able to hike off of. This means that the climbing finishes where the cliff ends; you have ‘topped out’ of whatever it was you were ascending and there’s no more climbing to do. In many cases, this means you are now standing on the summit of a mountain and have the opportunity to hike down an easier route that the one you just climbed up. In these instances, there’s no rappelling necessary; just pack up your gear, change out of your uncomfortable climbing shoes, and be on your way.
In other instances, however, this isn’t possible. Not all routes top out on a summit, and not all summits can be hiked off of. If this is the case, you might have no option but to rappel down the route. Rappelling a multi-pitch comes with several unique challenges:
- The anchors may not be conveniently located: Not all routes go straight up and down. Some, like Syphilis Summits on Ha-Ling in Canmore, contain large amounts of lateral movement. This can make the climbing more interesting, but it also makes it far more difficult to rappel, as you need to move sideways as well as downwards.
- It’s time consuming and exhausting: Rappelling down a multi-pitch, even though it seems like it should be fast, can take far more time that just hiking off. Remember, it’s not just the rappel you need to deal with. You need to locate the anchors amidst a sea of rock, tie yourself in, wait for your partner to clean all your gear, pull the rope, and then do it all over again— sometimes ten or twenty times.
- The rappels can be long, and you may be limited by your gear: These are the main problems that I’m going to cover in this guide. In an ideal scenario, you could perform each rappel with a double-rope rappel straight downwards to the next anchor. However, rock climbing rarely occurs under ideal conditions, and that’s rarely the case. This guide will show you how to navigate around this problem.
When Should You Rappel a Multi-Pitch?
Because of the reasons listed above, rappelling a multi-pitch is often not the recommended method of descent. However, there are some instances in which it may be necessary.
You SHOULD rappel a multi-pitch if:
- The route does not have a top-out, and the only way to get down is to rig multiple rappels
- Reaching the top is not feasible due to time constraints and/or the difficulty of climbing you’re facing. NOTE: If this is the case, only rappel down if you’re certain that you will be able to safely perform the rappels. If you’re not certain the route can be rappelled, hang tight and call for a rescue.
- You need to get down immediately: Ideally, you would never find yourself in this scenario, but shit happens while rock climbing. Storm blows in? Bolts on the route are missing? Climbing partner takes a fall and is unable to continue/needs medical attention? Sometimes you have no other option.
You SHOULD NOT rappel a multi-pitch if:
- There is any other option. Seriously, if you have the chance to hike down, just take it. It’s much, much safer, and will probably end up saving you time.
- Your guidebooks tell you not to. I don’t care if you’re the next Tommy Caldwell or you’ve canyoneered your way down Gloomy Gorge. If the guide book tells you not to do it, don’t do it.
- There are climbers below you. This can present a logistical nightmare, and you don’t want to be kicking rocks down on people.
Okay! Now that we’ve covered what a multi-pitch rappel is and when you should do it, lets get into some technique.
Double-Strand, Single-Rope Rappels

This is the holy grail of multi-pitch rappelling. Seriously, guys, having a multi-pitch route where you can rig double-strand rappels makes life far easier if you’re trying to get down.
The beauty of a double strand rappel is that it allows you to retrieve your rope without any hassle, blocking cords, or fear of getting your rope stuck in the anchors. Once both you and your partner have finished the rappel, it’s a simple matter of untying the stopper knots, securing the rope so that you don’t drop it, and then pulling it out through the anchor so that you can set up your next rappel.
However, just because this technique is familiar doesn’t mean you should overlook its dangers. Statistically speaking, rappelling is actually the most dangerous part of a climb, for the simple reason that it’s so easy to get careless. You’re physically spent from a full day on the wall and mentally tired from dealing with knots, anchors, clips, and rope all day. You’re happy that you’ve reached the top of your route, hungry because you didn’t bring enough food, and all you can really focus on in the beer that you know is waiting for you once you make it back down.
Under these conditions, it’s easy to forget to tie a stopper knot, leave your prussik back-up off, or forget to secure the rope when you pull it. Any of these mistakes cold be fatal, especially on multipitch routes where it’s not uncommon to find yourself hundreds of feet from the ground. Because of that, make sure you treat a double strand rappel with all the respect it deserves; if you don’t, you could find yourself making a very quick descent of the route.
So, how do you do it? The process, as I mentioned, is pretty similar to how you would approach any rappel that you performed from a single-pitch climb:
- From the anchor, make sure that you’ve tied a stopper knot into each end of the rope.
- Pull the rope through the anchors until the middle point marker (something you should have done BEFORE heading up the multi-pitch) is positioned between the two anchors.
- Secure yourself in using your rappelling device.
- Back the rappel up with a prussik knot or similar type of protection.
- Perform the rappel and arrive at the next set of anchors.
- Secure yourself to the anchors. If you’re the first to descend the route, make sure your partner is attached to the rope before you detach yourself. Best practices dictates that someone should be tied in at all times.
- Once your partner descends, make sure that one of you is secure to the rope before pulling it.
- Remember to undo your stopper knots! Getting a rope stuck in the anchors can be catastrophic if you’re several hundred feet off the ground.
- Pull the rope and repeat the process.
That’s a double strand rappel! Like I said, under ideal conditions, it’s not too different than what you would encounter rappelling from a single-pitch route, although extra care needs to be taken to ensure that you don’t drop the rope, get it stuck, or take a fall. Same skills, except the stakes are much higher, and the conditions may be more averse.
In a perfect world, you would be able to rappel every climb in this way— but, like I said, stuff in climbing rarely works out perfectly. There are two main reasons that you won’t be able to perform a double-strand rappel:
- The pitches are too long: The longest rope you’re going to find is 80 metres. Fold this in half for a two-rope rappel and you’re looking at 40 metres. Many multi-pitch routes will contain pitches in the 60 metre range, so a two-rope rappel just isn’t feasible.
- Your gear doesn’t allow it: Not every belay device is designed to perform two-rope rappels. In particular, I’m talking about the Petzl Gri-Gri, which is only designed for single-strand rappels. Gri-gri’s are, for many, the preferred belay device, and for long climbs I would highly recommend using one over a simpler device such as an ATC. However, gri-gri’s cant perform dual-strand rappels, so we need a new solution.
So, in either of the above scenarios, double-strand rappels simply aren’t feasible. In that case, we need to learn what is known as a blocked rappel.
Single Strand Rappels and Blocking

Performing a single strand rappel is easy. Performing a single strand rappel and setting it up so that you can retrieve your rope at the end is a little trickier, and it requires you to bring a second piece of rope called a retrieval cord.
A retrieval cord is a secondary rope, often lighter and smaller in diameter than your main rope, that you tie to the end of your rappel line and hang from the opposite side of the anchors. This allows you to use the retrieval cord to pull the rappel line back through the anchors once the rappel has been completed.
To understand this better, refer to the picture below:
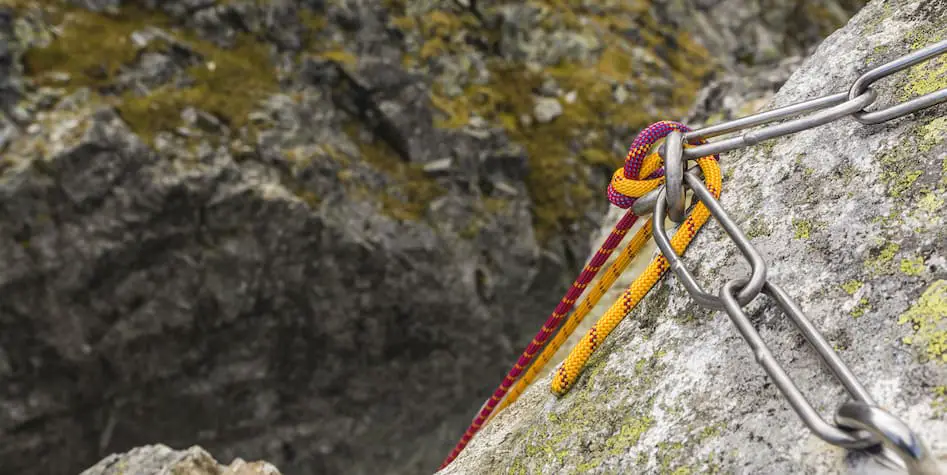
The yellow rope on your right is the rappelling rope that you will be descending from. The red one on your left is your retrieval cord. This will weight the yellow rope, which will pull downwards until the knot rests against the anchor and stops it from going any further. This keeps the rope in place and allows you to lower from it.
Note how, in the set-up, the retrieval cord is knotted to the rappel line on the left side of the rappelling anchors. This means, once the rappel has been completed, you can pull on the retrieval cord (with is on the left) and it will pull your rappel cord cleanly through the anchors. All the gear and knots are already to the left of the anchors, so there’s nothing here to get caught.
So, how do you perform this type of rappel? Let’s walk through the step-by-step process:
- Thread your rappel line through the anchors
- Attach it to your retrieval cord (NOTE: The knot you use to keep your retrieval cord and rappel line attached is the only thing that will stop the rappel line through the anchors and send you plummeting towards the ground. Use either a Flat Overhand or a Figure-8 Pass Through.)
- Attach yourself to the rope. Be careful to rig your rappel device up to the rappelling line; retrieval cords are often thinner and are not equipped to support the weight of your body.
- Perform the rappel with your partner following the same steps as described above.
- Make sure to untie the stopper knot in the rappel line.
- Attach the retrieval cord to your harness.
- Pull on the retrieval cord until the rappel line comes through the rings and falls down, where you can coil it back up and repeat the process for your next rappel.
Most of the actual rappelling that you do will be identical to that performed on a two-strand belay; it’s mostly in the set-up where you’ll need to learn new techniques. Because blocking rappels aren’t very common in other areas of rappelling, there are some things you should keep in mind:
- Watch your knot: As I said above, the knot that connects your rappel line to the retrieval cord is, by far, the most important part of this setup. You need to make sure it’s a large enough knot that it doesn’t pull through the anchors under the weight of your body; if this happens, you could be making a very unceremonious descent.
- Don’t trust the retrieval cord: The retrieval cord is for pulling your rappel line once you’re secure into the anchors. That is all it’s for. Don’t rig it for a two strand belay because your buddy said it would act as a backup. Don’t use it to secure yourself to an anchor. Don’t belay yourself up the pitch with it because your climbing rope got stuck. Use it for its intended purpose and nothing else.
- Practice, practice, practice: I know I harp on this one a lot, but you should listen to me more than normal here. Multipitch climbing is all kinds of dangerous, and the rappels can be where most of the accidents end up happening. More than that, the stakes are higher than normal; you’re hundreds of feet above the ground and a fall will almost certainly mean death.
Conclusion
That’s it! That’s the guide I’ve put together for multi-pitch rappelling. As always, the information you find on this website is meant to supplement your real world education, not replace it. Do NOT think that, just because you’re read this article, you’re ready to go rappel a multipitch route. Have a more experienced climber— or better yet, a certified instructor— show you the ropes first (ha) so that you know what you’re doing.
Thank you for reading and, as always, stay safe out there!