
While at the crag the other day, I decided that I wanted to learn a little more about rappel rings and the different ways they can be used. After doing some research online, I made this guide to tell you everything you need to know!
Rappel rings are metal loops that are bolted in to a wall and allow you to lower yourself down a length of clip. They’re essential for anybody who wants to rappel in an area where it’s impossible to build or find an anchor.
The most commonly found rappel rings are often at your local climbing crag, where they can be found at the top of sport routes. Aside from rappelling down a route, the also allow you to build anchors, clip quick draws, and have your belayer lower you without needing to leave any gear. They’re not only found at crags, though; popular rappel locations, such as canyons or caves, will often also have rappel rings present.
In the guide below, I go over what rappel rings are and then talk about situations in which you should and should not use them. I then detail how to use them in various scenarios!
What Are Rappel Rings?
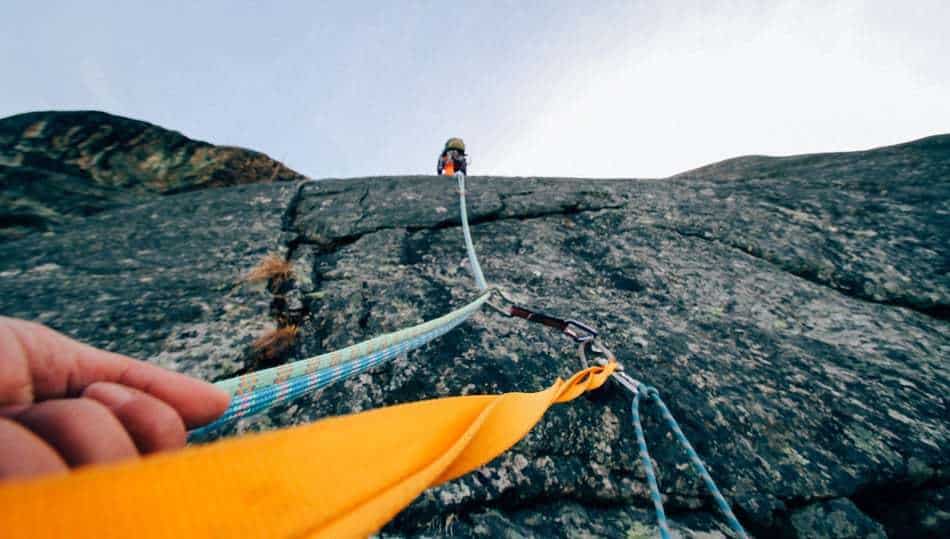
As I stated above, rappel rings are small, circular pieces of metal that are often attached to what’s know as a hangar. A hanger is a small piece of metal, bent at ninety degrees, with one end bolted in to the wall and the other end sticking out from the wall to allow you to clip in to.
With rappel rings, the metal loop is threaded through the open end of the hanger and then welded shut like so. This creates a rock-solid piece of protection for you to clip in to when climbing.
When Can You Use Rappel Rings?
As I stated above, rappel rings are useful when you need to lower down a location in which you don’t have the ability to build an anchor. Because they’re drilled directly into the rock, rappel rings can be placed almost everywhere and used for a variety of activities, from rock climbing to caving to canyoneering. When in good condition (and you should always inspect them before use), the rings provide super secure protection for you to put your weight on.
There are three primary activities where you would use rappel rings: climbing, canyoneering, and caving. I’ve broke each of them down in greater detail below.
Climbing
As I said above, if you’re a climber, you likely already have some familiarity with rappel rings. Almost every sport route has a pair of rings at the top for you to clip in to once you’ve completed the climb. Some crags will even have a pair of rings located close to the ground, so you and your partner can practice certain techniques before heading up the rock.
In terms of climbing, rappel rings serve several functions such as:
Rappelling off of: I know this one is incredibly obvious, but it’s still worth mentioning. Rappelling is one of the easiest ways to get down a route, and it places the least amount of strain on your equipment. Most routes will have two rings hooked in to two separate hangers; thread your rope through both of them, make sure it’s equalize, and lower yourself safely to the ground. When you’re done, simply pull your rope down after you. It’s nice and easy, and you don’t have to worry about leaving any gear behind.
WARNING: As of recently, the American Alpine Club has actually started actively discouraging rappels. According to the ACC, a large portion of climbing accidents happen during rappelling. Because of this, for sport routes, the AAC now encourages being lowered by your partner.
Lowering: This is probably the most common use of rappelling rings when climbing. For single-pitch routes, the easiest way to get down is to simply have your belayer lower so that you don’t have to go through the process of setting up a rappel.
Rappel rings are handy for lowering because of how secure they are and how simple it is to set up. This is especially true when you don’t need to worry about cleaning the route; just clip a quick draw in to each rappel ring, put the rope through the quick draw, and get lowered off of those. Even if you have to clean the route, it’s a simple matter of clipping in to the rings with your PAS, untying yourself from the rope, threading it through the rings, and then tying yourself back in to be lowered.
The disadvantage of lowering is that it does place more friction on both your rope and your rappel rings, because the rope will slide through the rings while your weight is on it (instead of just sitting statically, like it does in a rappel).
Building Anchors: Sometimes when climbing, you want to try a route on top-rope or create a more secure anchor— say, to belay someone up a multi-pitch route. In these instances, rappel rings are super useful because they provide a bomber connection to the rock, meaning you have to worry far less about your anchor failing on you. Simply build your anchor as you normally would and then use the rappel rings to clip your anchor yourself to the wall.
One thing to note: if you want to belay someone up an outdoor route on top-rope, never simply thread your rope through the rappel rings and then belay them off of that. This places incredibly strain on the rings and can cause them to lose both their shape and their structural integrity. Instead, clip in to the rappel rings with a carabiner and use some webbing to create a sling with which you can belay from.
Canyoneering

Canyoneering, which is sometimes also called canyoning, is another activity where rappel rings play a large role.
Canyoneering often involves lowering yourself down steep sections of rock, too steep to down climb and too wet to safely navigate. Because of this, the ability to rappel is essential. Rappel rings allow you to this this in a more safe manner than, say, trying to build your own anchor; they also allow you to not have to leave any gear behind.
The main advantage of the rappel rings, aside from how secure they are to the rock, is that they wear far less on your rope than would be the case if you had to rappel off of a piece of webbing. Allowing the rope to slide against the smooth, metal sides of the rappel ring is far better than dragging it against a sling or similar piece of gear.
Rappel Rings also give you a secure place to anchor in if you’re on uncertain terrain and you want to rest without having to worry about falling. By using a sling or a PAS, you can anchor yourself to the rings and achieve a little peace of mind.
Pro Tip: When canyoneering, it’s always a good idea to bring a couple of screw-links, spare rappel rings, or similar bail carabiner with you just incase you come to an anchor and find that the rappel ring is worn down (later in this article, I’ll cover how to check if a rappel ring is safe to use or not). In such an instance, simply place your own gear on the same hanger as the rappel ring and use that as your point of connection. It’s better to leave a $10 carabiner behind than to have to worry about the safety of your rappel.
Caving
Similar to canyoneering, caving often involves lowering yourself down cliff faces where it would be impractical, or impossible, to build an anchor. Here, rappel rings become incredibly valuable pieces of equipment, as they allow you to safely navigate these obstacles.

The rings also serve another purpose, one that you won’t find as often when climbing or canyoneering: they allow you to leave as rope behind for you to ascend later using a jumar or similar device. This is extremely handy if you lower yourself down a cliff that you can’t climb back up; however, it does present it’s own unique set of considerations:
- Always make sure you have a rappel device capable of doubling as an ascender
- Be aware of the fact that other people might need to use the same rappel ring, so leaving a rope behind may not be appropriate
- When leaving a rope, it’s often tempting to simply tie in to one rappel ring and do a single-strand rappel. This means that you don’t have the backup safety of being clipped in to two rings. To fix this, you can always run a sling through your rope and connect it to the other rappel ring to serve as a backup.
When to Not Use Rappel Rings
Although rappel rings are extremely useful and can make your life a lot easier, you still need to approach them with caution before you use them. Unless you set the route you’re climbing by yourself, you will be relying on whoever it was who set up the rappel rings to anchor yourself to the wall. Most of the time, this is okay; most popular rappelling areas have climber’s associations, or some similar organization, that take care of the gear on the walls and ensure that it’s always in good shape.
However, even at your local crag, there can be hundreds (if not thousands) or pieces of hardware drilled in to the rock at any given time. Add on to this multi pitch routes, caving expeditions, and canyoneering locations, and it’s unreasonable to expect that anyone would be able to keep track of the quality of every piece of gear in a give area. Because of that, it’s essential to do your due diligence before you trust a rappel ring with your weight.
When examining a ring, there’s two things you want to look for to know if it’s safe: the quality of the rings itself, and the quality of its attachment to the rock. The first concerns the physical ring, while the other has to do with the hanger and bolt that secure it to the wall.
Checking the Rappel Ring
Checking your rappel ring is essential so that you can find out if it’s safe to put your bodyweight on or not. Thankfully, most of the checks you need to perform are simple visual ones, and can be done in a relatively quick period of time. That being said, always take your time and make sure to follow all of the steps.
Before trusting a rappel ring with your weight, look for:
- The overall quality of the ring. Here, you’re checking to see if environmental factors like water or rockfall have taken a toll on the rappel ring. Look for any rust that may indicate structural weakness, or any dents/chips in the metal that indicate it may have been damaged in the past. Either of these can be indications that the rappel ring is not at 100% strength.
- Check the inside of the ring for grooves. If they’re used over and over again in the same spot, rappel rings can actually developed grooves in the metal from the constant pressure of rope being run through them. These don’t always mean that the rappel ring is unsafe to use, but it’s definitely worth your time to spin the ring around so that you’re not putting your rope in the groove.
- Examine the quality of the weld. The weld is the most important part of the rappel ring, and it also happens to be the weakest. Make sure that it’s a solid weld, with no gaps or weaknesses. If, for some weird reason, you get to a rappel ring that hasn’t been welded shut, do not trust it with your weight.
- Check the inside of the ring for any burs. Sharp metal edges, also called burs, can sometimes develop on rappel rings if other climbers have caused metal-on-metal friction. These pose a danger to your climb, because they can both damage the integrity of the ring and may cut through the sheath of your rope.
- Test the overall shape of the ring. If the ring has been bent into an oval shape, this could mean that too much force has been applied at one point and damage has been done to the structural integrity of the ring.
Check the Bolt and Hanger
Even if a rappel ring is in perfect condition, it can still be completely unsafe to use if the anchor that holds it to the wall is weak. It’s essential to check these two pieces of gear to make sure they won’t come loose during your rappel. When examining a hanger and bolt, look out for the following things:
- Movement in the hanger. Your hanger should be as solid as the rock it’s attached to. If you can move it even just a little bit, this is a sign that it’s not secure enough and may come loose.
- Connection to the rock. Sometimes, bolts can come loose over time and start to slide away from the rock. This means that they’re not secure anymore and shouldn’t be trusted with your weight.
- Overall condition. As with the rappel rings, you want to be careful to check for rust, divots, or any other physical defects that could compromise the strength of the bolt or the hanger.
- Strength of the surrounding rock. Just like the rappel ring is only as strong as the hanger it is attached to, the hanger and bolt are only as strong as they rock they’re drilled in to. Always check the rock to make sure it’s solid enough to hold your weight.
How to Use Rappel Rings

Now that we know what rappel rings are and when it is/isn’t safe to use them, I’m going to break down how you can utilize them in a couple of different scenarios.
Climbing/Lowering
This will apply mostly for single pitch sport routes, when you’ve reached the top of your route and want to have your partner lower you down:
- Clip yourself into one of the rings using a PAS.
- Using a quick draw, connect yourself to the other rappel ring using a different link on the PAS. This backs up your anchor should one ring fail.
- Have your belayer give you some slack so you can test that your anchor is secure. If it holds, proceed with the next steps.
- Pull up some slack in the rope and tie an overhand knot.
- Clip that knot through a carabiner that’s attached to your harness. Now, the rope is attached to you through some means other than your figure-8.
- Untie the figure-8 knot from your harness.
- Thread the rope through both rappel rings.
- Re-tie yourself into the rope using a figure-8 knot.
- Unclip the rope from your harness, untie the overhand knot, and have your belayer pull in all the slack.
- Test the rope with your weight on it to ensure that it’s secure.
- If it is, proceed to unclip your PAS and quickdraw from the rappel rings. You are now suspended by the rope, which is threaded through the quick-draws, and are ready to be lowered by your partner.
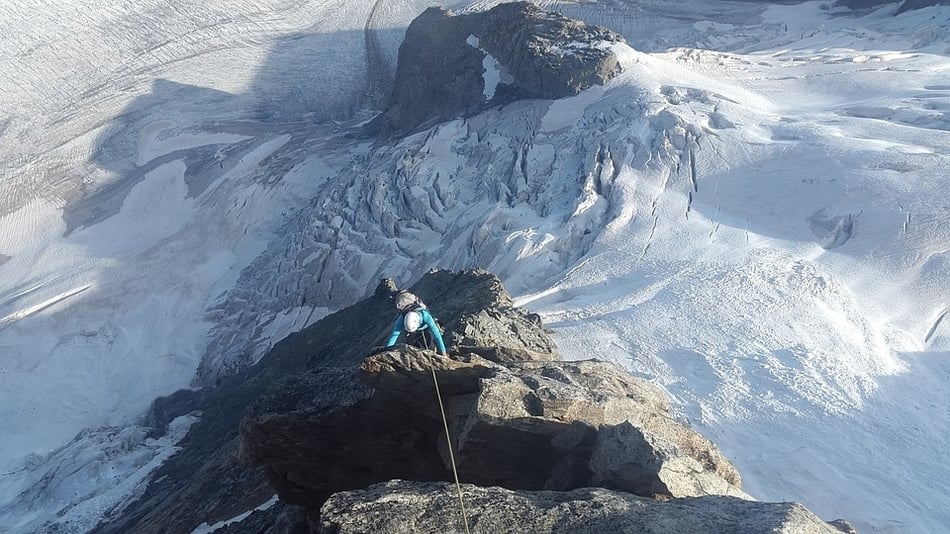
Rappelling (Two Strand)
- Anchor yourself in to the rappel rings using a PAS, sling, or similar device.
- Ensure the rope is secured to your harness using an overhand knot clipped through a carabiner, or some similar technique.
- Thread one end of the rope through the rappel rings and tie a stopper knot.
- Locate the other end of the rope and tie a second stopper knot.
- Begin to pull the rope through the rappel rings until you locate the halfway point on the rope. Ropes usually come with the half-way pre-marked; if not, you should mark it in advance of your rappel.
- Connect your rappel device to the rope and then secure it to your harness.
- If using an ATC or other non-locking device, back up the rappel with a prussik or similar knot.
- Once the rope is securely through your device, untie the overhand knot and let the rope drop.
- If possible, do a visual check to ensure that both ends of the rope are on the ground.
- Un-anchor yourself and proceed to rappel.
Rappel (One Strand)
- Anchor yourself to the rappel rings.
- Connect one side of the rope to the rappel rings using your preferred knot. If you only tie it to one rappel ring, consider backing it up on the other ring.
- Tie a stopper knot on the other end of the rope.
- Lower the rope.
- Connect your rappel device to the rope.
- Un-anchor yourself and proceed to rappel.