
The first time I went ice climbing, I had no idea what to pack. I made the following list so that you can know what gear you need to bring.
So, what should you pack ice climbing? To go ice climbing, you will need the following gear:
- A pair of ice axes
- A pair of ice climbing crampons
- Mountaineering boots
- A harness
- A helmet
- A belay device
- Proper clothing
- A backpack to carry everything
- Food and water
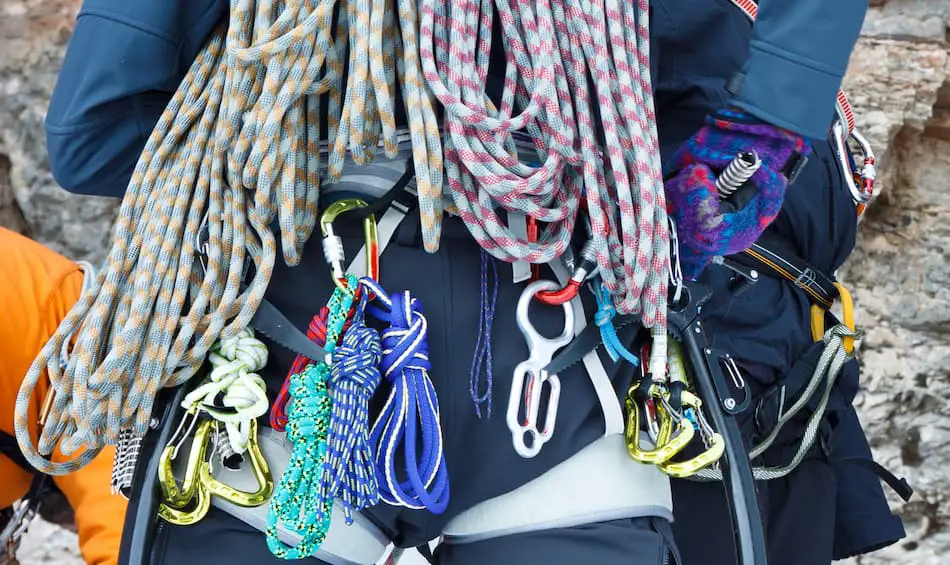
- Group gear, like a rope and ice screws
Ice climbing is a sport that requires a lot of equipment, so it’s important to make sure you have everything! The most important things are your axes, crampons, and mountaineering boots, which are what actually allow you to ascend the ice. These items can be pretty expensive to purchase; thankfully, they can often be rented or borrowed from a more experienced friend. Additionally, you need standard climbing equipment like a harness and a helmet. Finally, proper clothing is essential to keep you warm and ensure you’re not sweating.
Ice Climbing Checklist: What You Need to Go
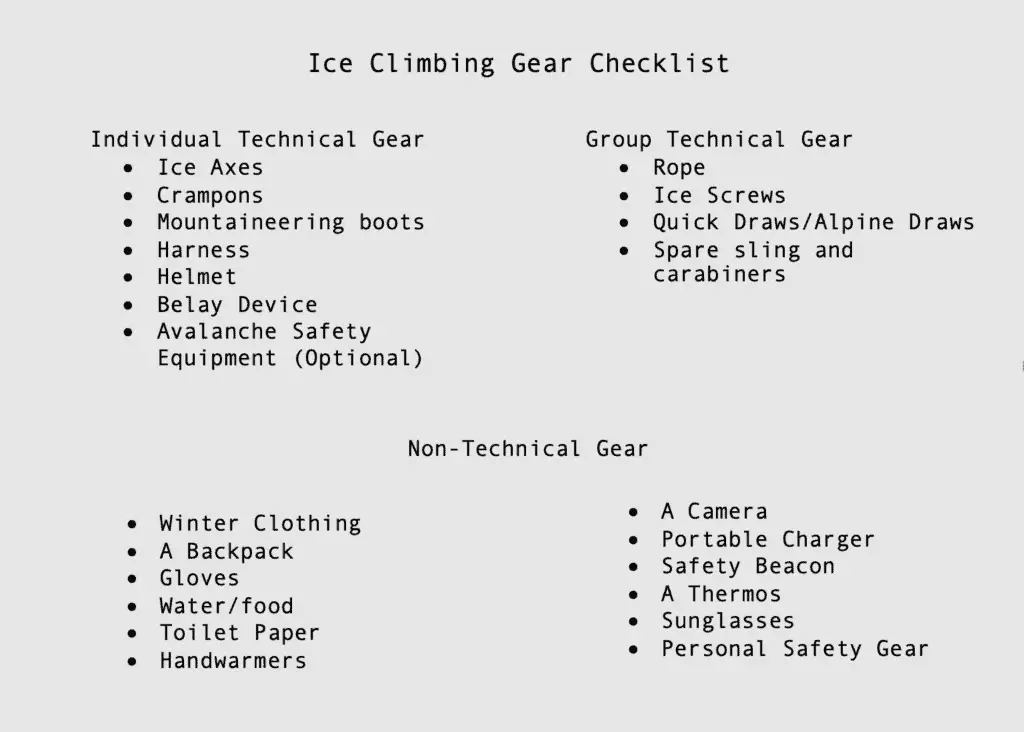
When you’re speaking of ice climbing gear, you can break everything down into three main buckets:
- Individual technical gear: This is climbing or ice-climbing specific gear that each person going ice climbing needs. These are items that can’t be substituted for anything else (e.g., you can’t use a normal axe in place of an ice axe).
- Group technical gear: These are climbing or ice-climbing specific things that you need to have at least one of per group whose ice climbing, but that not everyone needs to carry. For example, you need a rope to ice climb, but not everyone in the group needs their own rope.
- Non-technical gear: This is stuff that you still need for ice climbing, but that you can probably find lying around your house. For example, everyone likely has a warm jacket and a backpack, even if it’s not an ice-climbing specific backpack. Some of this gear is also optional.
As you can see on the list above, each category has an extensive list of gear. In the guide below, I break these pieces of gear down in more detail, so you know exactly what to look for when you’re packing!
Individual Technical Gear
First, let’s talk about the individual technical gear. Like I said, this is stuff that you’ll need to bring with you every time you go ice climbing. Individual technical gear is mostly what you use to ascend the pitch of ice in front of you, which requires specialized tools designed for vertical ice climbing.
Ice Axes
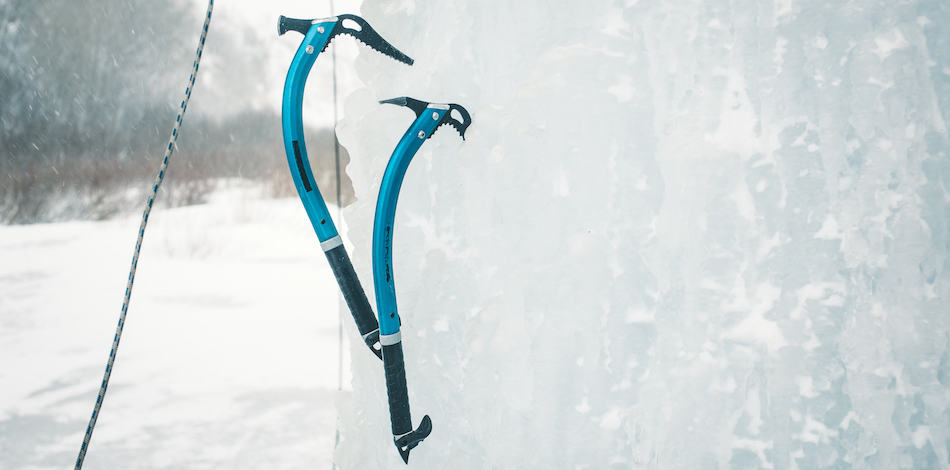
Ice axes are what you swing into the frozen surface in front of you. They penetrate the ice and stick in place, allowing you to gain traction with your hands.
When you’re talking about axes, there are a couple of different kinds to be aware of:
- Ice axes: Featured in the picture above, these crescent-shaped tools are designed to swing well and to be easy to hang your body off of.
- Mountaineering axes: These have the same head as an ice axe, but they feature a straighter shaft that’s designed to stab into deep snow.
- Hybrid axes: With a slightly kinked shaft, these can serve for vertical ice climbing while also working for mountaineering purposes.
If you’re going out purely ice climbing, you obviously want to get the curved-shaft version of the tool. These will be weighted better for swinging, and they’ll be infinitely easier to hold on to. You could probably make do with a hybrid axe, but it’s going to make it far harder for you to perform.
In terms of ice axes, you always need to carry two (one for each hand). If you’re a beginner climber, it might be a good idea to get some kind of tether that will attach the axe to your harness just in case you drop them.
Crampons
Just like with axes, there are crampons designed for mountaineering and crampons designed for ice climbing. Obviously, you want the ice climbing ones!
The big differentiator here is that ice climbing crampons reinforced front points that are designed to be kicked directly into the ice. This allows you to stand up on your toes and gain purchase when climbing.
In comparison, mountaineering crampons had downturned front points that are built for digging into steep snow faces. While you technically can ice climb with these, it takes a lot more effort, and I wouldn’t recommend them unless you’re an experienced mountaineer.
The other thing to consider is how many front points you want. There are two options: mono (one) pointed crampons, and duo (two) pointed crampons.
As a general rule, duo pointed crampons offer more stability and safety with your foot placement, because there’s more holding you onto the wall. On the flip side, monos allow for much more precise footwork.
I would say that if you’re a beginner, go with a pair of duos for the stability they provide you (if you rent gear, most places will give you a pair of duos).
For more info on what the best ice climbing crampons are, check out my guide here!
Mountaineering Boots
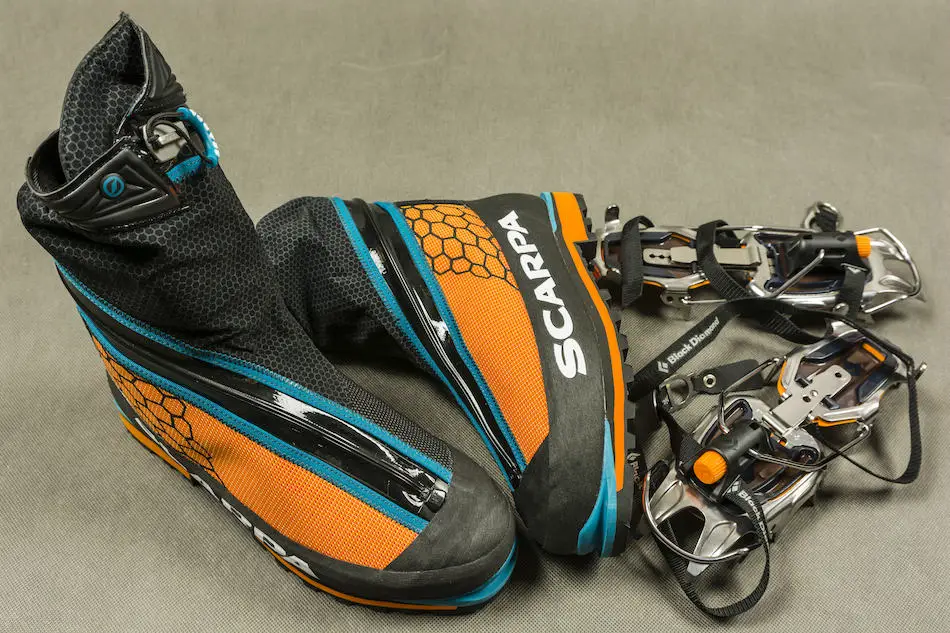
To properly fit the crampons onto your feet, you need a pair of mountaineering boots. Mountaineering boots are stiff-soled, high-ankled shoes that are designed to be combined with crampons.
For anyone who’s ever worn a hiking boot before, a mountaineering boot is like that except on steroids. The soles are ultra-firm and have almost no flex in them, so walking around can feel clunky the first time you do it.
However, this clunkiness turns into a benefit when you’re ice climbing. The stiff sole of the boot helps you stand on crampons without tiring out your calves (as much — your calves will still get tired).
Sizing your mountaineering boots can be a bit of a chore. You want them snug so that your feet don’t move around, as this gives you more control when you climb. However, at the same time, you don’t want them too small; this will cause your toes to jam up against the front of the boot as you’re kicking into the ice. In my experience, I would say that you should size about one half to a full size about your street shoe.
A Harness
Everyone in your ice climbing group needs to have a harness, as you’ll use it to tie into the rope so that you can either climb or belay.
For anyone who rock climbs, it’s likely that you already have one of these. If so, you’re in luck! A normal rock-climbing harness will work fine for ice climbing, especially if you’re only going for the day. I would just make sure that the harness is comfortable enough to wear all day along. Additionally, you should check that it still fits you when you’re wearing your snow pants.
If you’re set on buying ice climbing gear, you can get ones that are specific to alpine sports. These harnesses have loops on the side that you use to hook your ice axes when not climbing. This means you don’t have to worry about carrying them if you’re belaying a multipitch or rappelling from a route, which can really make life easier.
However, these are more expensive, so I wouldn’t recommend getting one unless you’re committed to ice climbing. If you’re just trying the sport out with a friend or purchasing a lesson, any rock climbing harness will do fine.
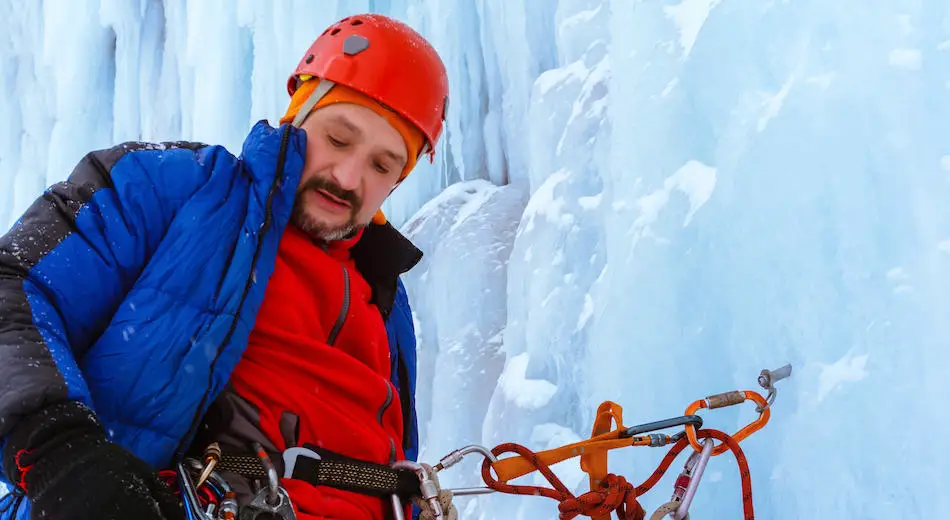
A Helmet
You should be wearing a helmet from basically the first moment you tie into your rope until all of your gear is packed up at the end of the day. Ice fall is a serious danger when ice climbing, and it can cause serious or even life-threatening injuries.
It’s also imperative that your belayer be wearing a helmet as well, because you’re going to be sending chunks of ice falling towards them as you climb. If they get knocked out by one, you would be in serious trouble up on the wall.
In terms of what helmet to wear, any rock-climbing helmet will do. I personally still wear my Black Diamond Half Dome, which I wear for any alpine sport (ice climbing, climbing, scrambling, etc.). It’s solid and gives me lots of protection, so I like it.
What I wouldn’t recommend doing is wearing a non-climbing helmet, like a bike helmet or hockey helmet. These pieces of gear are rated for different kinds of impact: for example, a hockey helmet is designed to protect your head when you get body-checked, not necessarily to lessen the impact of a fifty-pound chunk of ice smashing down on you.
A Belay Device
Your belay device is technically something that could be shared between climbers, but it’s honestly easiest for everyone to have their own. This will mean you don’t have to swap gear, and it will allow for your group to rappel should they ever decide to.
When looking for a belay device, I would say that the less fancy it is, the better. In the age of auto camming devices, gri-gri’s, and mechanical parts, something like a simple ATC still holds up for ice climbing.
This is because you need to contend with snow, water, and ice within your device when climbing. These can get stuck within the device and will cause it to jam or freeze if it has any moving parts (like a gri-gri does).
Because of this, a simple friction device will work best. Make sure you have practice belaying with it before-hand, though!
Avalanche Safety Equipment (Optional)
Avalanche safety gear in ice climbing is a contentious issue, so much so that I’ve written an entire other article about it. The summary is essentially this: while not everyone carries avalanche gear when ice climbing, there’s an increasing awareness within the community that it should become part of your everyday safety kit.
Now, there are some caveats to that. If you’re going with a guided group or an experienced friend, and your objective for the day is to climb at a well-known ice climbing crag, you probably don’t need to worry about avalanches, and you can leave the safety gear at home.
If you’re climbing anywhere in the alpine, though, where you might be exposed to avalanches, it can be a good idea to bring this kit along. It only weighs a few pounds, and it could save your life.
Standard avalanche gear includes three things: a beacon, a shovel, and a probe. These items can often be rented from any backcountry skiing or outdoor gear store.
Group Technical Gear
We’ve now covered the individual gear that you need to go ice climbing, so it’s time to move on to the group gear that you need to bring along. Group gear is stuff that you don’t have to have yourself, but that at least someone in the group needs to be carrying.
If you’re going with an experienced friend, or a guiding group, they’ll most likely have all of the gear that you need. Make sure to double check beforehand, though, and offer to carry some of it for them!
Rope
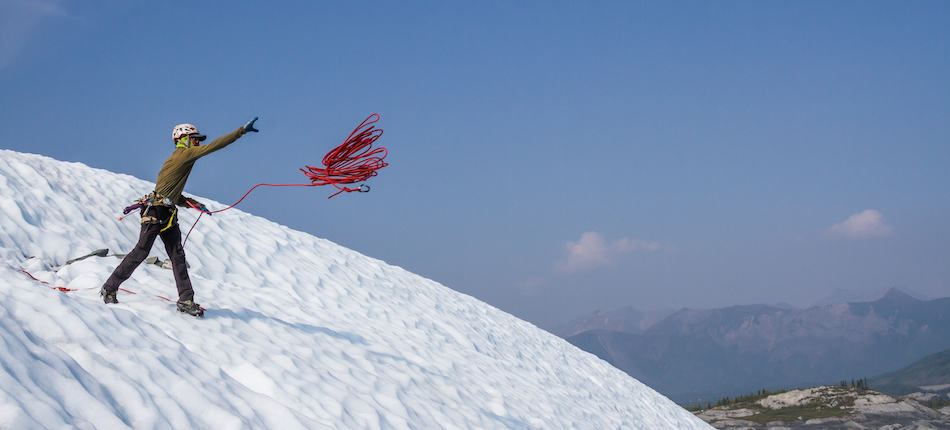
Unless you’re the late and great Marc Leclerc, you need a rope to go ice climbing. It will allow you to top-rope as a beginner, and it will catch you if you fall while leading.
Similar to rock climbing, your rope has to be dynamic and I would say it should be at least 9.4mm wide (go more like 9.8mm, if you’re a beginner). Dry treatment is a must, because the rope is going to be sitting in the snow all day.
For longer routes, many ice climbers elect to use a half rope system to lessen rope drag and allow them to lower from the rope via rappel. I would only really recommend this if you’re doing a multi-pitch route; for cragging, it’s probably best to just use a single rope.
Check out my article here for more information on ice climbing ropes!
Ice Screws
Ice screws are maybe the most prohibitive piece of gear to acquire for a first-time ice climber. They’re stupid expensive, with each screw costing at least $60 (and you need a half-dozen of them, minimum). Furthermore, most places don’t rent ice screws, so you’re forced to purchase them if you want to go.
This is where it’s best to have a more experienced partner to go with you, because they’ll likely own the ice screws for you to sue. In lieu of that, you can go with a guided group, and they’ll definitely provide this piece of gear.
Really, if you’re a beginner climber, you don’t need to worry about ice screws. You won’t be using them (because you only use ice screws when you’re lead climbing, and new ice climbers shouldn’t lead for a long time). The only thing you should concern yourself with is offering to carry these for your partner so that the weight is distributed a little more fairly.
Quick Draws/Alpine Draws
Once you’ve placed the ice screw in the ice, you need to worry about clipping your rope through it. For this, you can either use a quickdraw or an alpine draw.
If you’re a climber, you probably have a few quickdraws lying around, and it can be a good idea to bring them with you when you go (if you’re going with a guided group, you probably don’t need to bring any).
Alpine draws are similar to quickdraws, except they’re longer and can reduce rope drag. This can be good on wandering routes (although, again, this isn’t really something you’ll need to worry about unless you’re leading the climb).
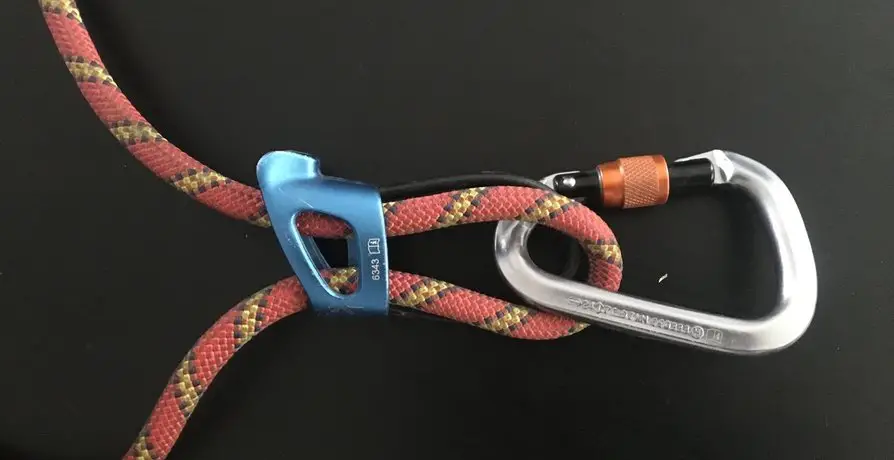
Spare Carabiners/Slings
Finally, it can be good to have along a few spare carabiners and slings with you when you go. These help build anchors and manage gear. If you have some of these lying around it might not be a terrible idea to throw them in your bag.
Non-Technical Gear
Finally, let’s move on to the non-technical gear. Non-technical gear is stuff that isn’t ice-climbing or climbing specific, but is still necessary to ensure that you have a safe and enjoyable day while climbing.
Odds are that you’ll already have most of this stuff lying around your house, or you have something similar that can be repurposed for ice climbing. For example, most people have a good pair of gloves or mitts, even if they’re not meant specifically for ice climbing.
Proper Clothing
The first thing to talk about is clothing. Warm clothinng is essential for ice climbing, because you’re outside in freezing temperatures for prolonged periods of time. However, at the same time, you’re also doing a high-exertion activity, which cause you to sweat. Sweating cools your body down, which can actually be dangerous; once you stop moving, the sweat can cool you down too much and lower your internal body temperature to a dangerous degree.
To get around this, ice climbers use something called layering. Layering is when you wear multiple pieces of clothing over each other, so you can take off/add on layers as you want.
I have a complete breakdown to layering here, but there are essentially three main layers that you’ll wear:
Base Layer
Your base layer is what you put on at the start of the day and don’t take off until you get back home. It’s often made of lightweight, warm pieces of clothing that fit tightly to your body. You want something that won’t move lots or take up lots of room, because you need to put other clothes over it.
I personally wear long underwear for my legs and a t-shirt for my upper body as my base layer. On a cold day, I’ll put a thin sweater (like the Patagonia R1) over the shirt for a little added warmth.
If you have any quick-drying clothes, I would recommend using these for your base layer. If not, try to just go with something that’s comfortable and not too bulky. For those of you who don’t own thermal underwear, a pair of sweatpants or pyjama pants will work alright.
Active Layer
Your active layer is what you wear when you’re climbing. It needs to be warm enough to fend off the cold, while also being breathable enough to lower the amount you sweat.
Outdoor apparel companies make a lot of money selling high-tech pieces active insulation clothing. Examples of these include the Patagonia Nano Air and the Arc’teryx Atom. These jackets are super comfortable to wear and can make your day more enjoyable, but they’re not essential.
A warm sweater or a medium-weight jacket can work for your active layer if you don’t have anything more specialized. Your ski jacket may also have a removeable inner lining that could work. If you’re unsure of what you want to wear, bring a few sweaters of different weights and put them on/take them off as you need!
You don’t really have an active layer for your pants, as it’s too much of a hassle to try to add/remove them while you’re wearing crampons.
Insulation Layer
Your insulation layer is what you wear over top of everything else when you’re not moving. For your pants, this includes snow pants and maybe a pair of down pants if you’re fancy/extremely cold. For your upper body, this simply needs to be the warmest jacket you have. It should also be a little bulky, because it needs to fit over your other layers.
Gloves
Warm gloves are essential for ice climbing. Like all of your other pieces of clothing, I would recommend layering them:
- Have a thin pair of gloves that you use for when you’re actually climbing. This gives you more sensitivity on your ice axe and allows for better control.
- Bring a warm pair of gloves or mittens to put overtop of these small gloves for when you’re belaying or standing around. I personally prefer mittens because they allow you to curl your fingers together and provide more warmth.
Socks
Finally, you should worry about your socks. A good pair of warm socks, like the ones you would wear skiing, should do. Some people double layer, although this can make your feet feel pretty bulky, so I wouldn’t always recommend it.
Make sure to try on your mountaineering boots wearing the same socks you’ll wear climbing, or else it could change the fit of the boot.
A Backpack to Carry Everything
We’ve gone over a lot of gear in this post, so you definitely need a pack to carry it all. I would recommend a hiking or athletic pack (preferably one that’s got hip straps to take some of the weight off of your shoulders). It should be at least 30 litres to fit all of your gear inside of it.
There are specialized ice climbing packs that have holders for your tools and helmet, but these aren’t essential. Any old backpacking pack will do!
Water/Food
Ice climbing is a strenuous activity, and you need to make sure you’re eating/drinking enough to keep your body functioning. Eating is especially important in the cold, because your body burns calories to stay warm. I would think about how much food you normally consume in an 8-hour window, and then bring twice as much as that (nothing sucks more than running out of food in the wilderness).
Water is also important (and often overlooked, because of the cold). You should have one or two litres of water with you, and you should remind yourself to drink throughout the day.
Miscellaneous Gear
Finally, there are some other pieces of gear that, while not being essential, can be good to bring along if you have room!
Toilet Paper: Always good if you need to go in the middle of the way. Carrying a roll is bulky, so I just put some in a Ziploc bag.
Handwarmers: These are great if you’re like me and your hands get numb. I have a pair of handwarmers in my gloves at all time, and I would recommend you do the same. j
A Camera: Being outdoors is all about making memories, and having a camera is a great way to immortalize those moments. Of course, nowadays most people just bring their phone; if you do this, make sure you have…
A Portable Charger: Batteries die way faster in the cold, so it’s good to have a little extra juice along so your phone doesn’t die halfway through the day.
Safety Beacon: Ice climbing is dangerous, and you’ll often find yourself in a place where you don’t have cell reception. Some kind of beacon like a SPOT can be a life saver.
A Thermos: If you’re cold, a warm drink or meal can be the perfect pick-me-up. I personally always pack something warm for lunch, like a soup or curry, and keep it in my thermos.
Sunglasses: The sun will reflect off of the ice and snow around you, which can become blinding. A good pair of sunglasses prevents this, and also protects your eyes from any falling ice chips.
Personal Safety Gear: This include anything that you know you need to be safe out there. This could include an inhaler, any medications, an emergency blanket, or anything else you need to feel safe. Some people carry more general gear, like fire starters and a first-aid kit. As long as you have room in your pack for it, I would say that it can’t hurt to bring these items along!